
Anatomy of a Bottle
Every bottle has a number of important features, from the opening at the top to the base it stands on. Understanding these parts makes it easier to describe a bottle, identify packaging needs, and communicate with customers, suppliers, and packaging specialists.
Knowing the basic parts of a bottle helps everyone use the same language when discussing packaging. You don't need to understand every engineering detail. Start by learning the names, locations, and purposes of the most common features.
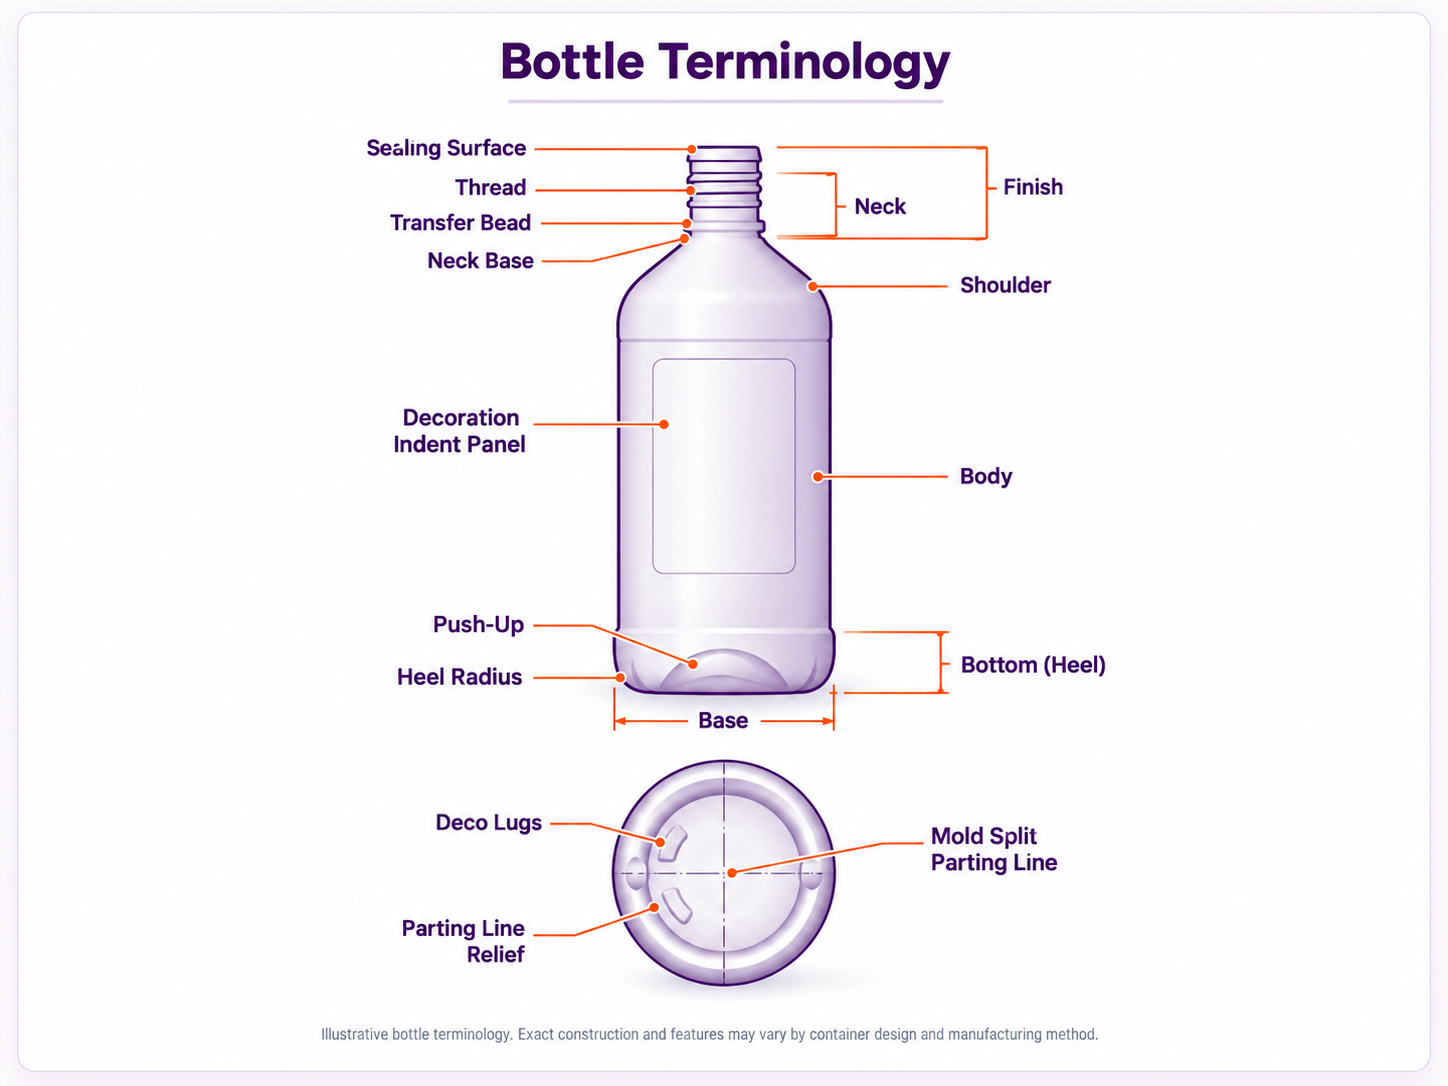
Bottle terminology diagram showing key rigid packaging bottle components and base features.
The Main Parts of a Bottle
Let's start with the features you'll hear about most often in packaging conversations.
Neck
What it is: The upper portion of the bottle where the opening is located.
Why it matters: The neck allows the bottle to be filled and the contents to be poured or dispensed.
Neck Finish
What it is: The portion of the neck designed to receive a closure, including the applicable threads or other fastening features.
Why it matters: The finish must be compatible with the selected cap, pump, sprayer, or other closure.
Shoulder
What it is: The area that transitions from the neck to the wider body of the bottle.
Why it matters: The shoulder influences the appearance, shape, and structural performance of the bottle.
Body
What it is: The main section of the bottle that holds the product.
Why it matters: The body determines much of the bottle's appearance and provides space for branding and product information.
Label Panel
What it is: An area of the body intended for labels or decoration.
Why it matters: Its size, shape, and surface affect how labels fit and look.
Sidewalls
What they are: The surfaces forming the sides of the bottle body.
Why they matter: They contribute to the bottle's strength, handling, and appearance.
Heel
What it is: The transition between the bottle's sidewall and bottom.
Why it matters: Its design helps provide stability and distribute stress.
Base
What it is: The bottom portion of the bottle.
Why it matters: The base supports the container and helps it stand securely on a surface.
Closure
What it is: A separate component used to close or dispense from the container.
Why it matters: It helps prevent leakage, protects the contents, and enables convenient use.
The bottle's neck finish and closure must work together. Two components that appear to be the same size are not necessarily compatible.
You'll learn more about neck finishes and closures later in Bottle School.
Additional Features You May Encounter
Not every bottle has every feature. However, becoming familiar with these terms will help you recognize and describe packaging more accurately.
Sealing Surface
The surface around the opening that helps create a seal with a compatible closure or liner. Its condition is important for preventing leaks.
Threads
Raised spiral features on many bottle necks that allow screw caps and other threaded closures to be attached.
Transfer Bead & Neck Base
Features located around the lower neck area of some bottles. Their design can relate to manufacturing, handling, or other package requirements.
Push-Up
A raised or recessed feature in the bottom of certain bottles. Its configuration depends on the container's design and manufacturing process.
Parting Line
A line that may be visible where sections of a manufacturing mold meet. It is commonly encountered on molded plastic bottles.
Decoration Features
Some bottles include recessed label panels, molded decoration details, embossed lettering, or other design elements.
Why Does Bottle Anatomy Matter?
Understanding bottle terminology makes everyday packaging conversations clearer, especially when discussing product requirements or reporting concerns.
Real-World Example: A Leaking Bottle
Imagine that a customer reports leakage around a bottle's cap.
Rather than simply describing the bottle as defective, you can help identify where the problem appears to be occurring.
- Is the leak coming from the neck finish?
- Does the sealing surface appear damaged?
- Is the closure seated correctly on the bottle?
- Is there visible damage to the threads?
These observations help a packaging specialist or quality team understand the concern and determine what additional information or testing is needed.
Important: Identifying the location of a problem does not establish its cause. Packaging concerns should be evaluated using the appropriate product specifications and quality process.
Whenever you're examining a bottle, begin by identifying its neck, shoulder, body, and base. Then look for features that affect sealing, filling, handling, and decoration.
What You've Learned
The goal of this lesson is to recognize common bottle features and understand their purposes.
Five Things to Remember
- The neck is the upper portion of the bottle where filling and dispensing occur.
- The neck finish must work with the selected closure.
- The shoulder connects the neck and body.
- The body holds the product and commonly provides decoration space.
- The heel and base help support the container and contribute to stability.
In Lesson 3, you'll learn to identify a bottle's footprint, including round, oval, oblong, square, rectangular, triangular, and D-style designs.
You'll also learn the difference between a bottle's footprint and its overall shape or style.